fbpx
Follow:
Browsing Tag:

Reviews

    Beauty, Reviews

    Review: Ben Nye Banana Powder

    OLYMPUS DIGITAL CAMERA

    I found out about the Ben Nye Banana Powder when I was taking up my certificate course in make-up at MUD. My teacher, Ms. Georginna Desuasido recommended the Ben Nye Luxury Banana Powder as a nice finishing powder. I decided to try it out. Right about the time that I bought my bottle, I started noticing that the product was selling like hot cakes on my Facebook and Instagram feed. I decided to check it out and I found this photo:

    OH MY GOSH. I found a lot of images online but I think that this is the best photo that could explain why the Ben Nye Banan powder is so popular right now! I’m pretty sure both Kim K fans and haters who will see this photo is most likely going to buy themselves a bottle of this “miracle” powder. Scroll down to hear my thoughts on the product! :)

    Product


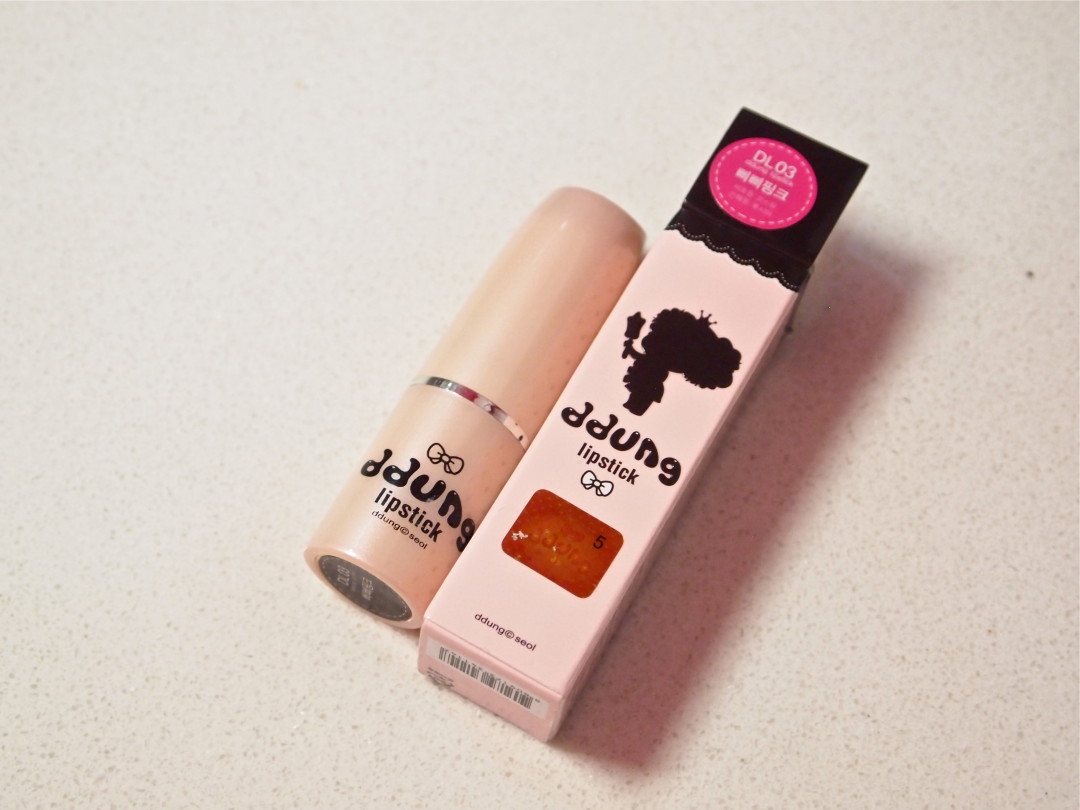
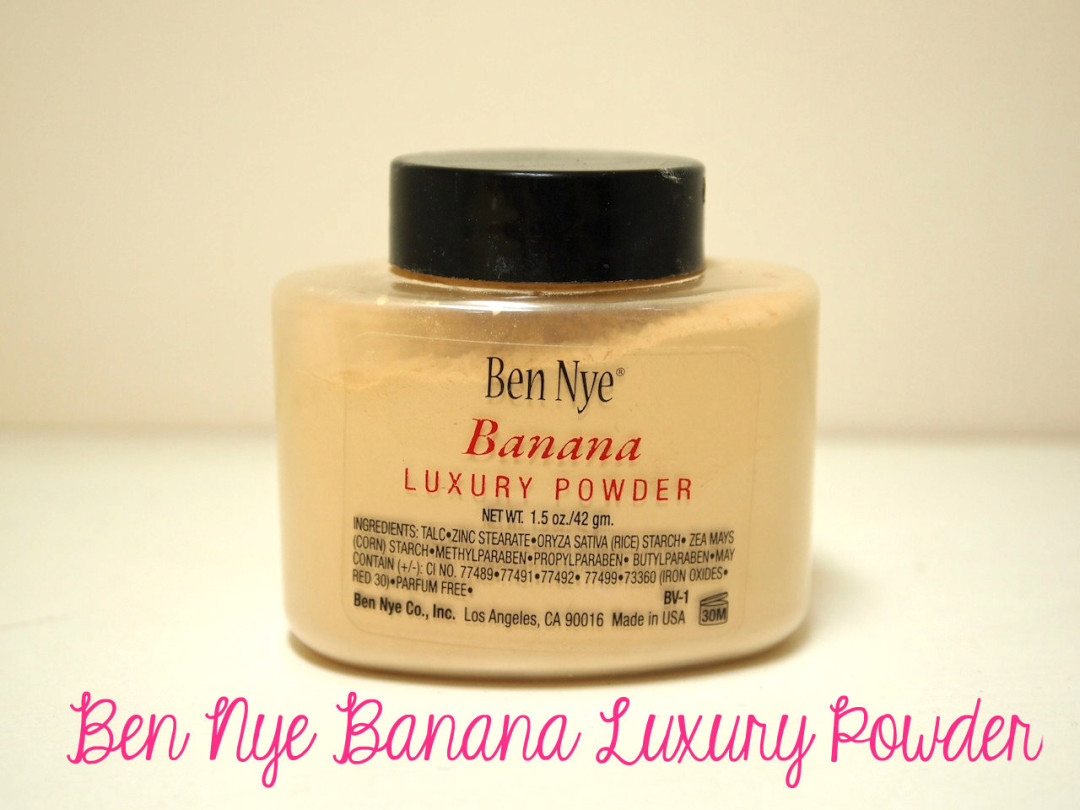
    The product is a yellow based translucent powder that is housed in a clear plastic white bottle/jar. It doesn’t look like the usual setting powder that you are used to seeing because there is nothing glamorous about its packaging. I’m not really complaining about the packaging because I think the packaging adds to it’s no non-sense charm though. The Ben-Nye luxury powder coms in different shades but the most famous shade is in Banana.

    What I love:

    • Don’t be intimidated by the yellow tinted powder because it actually blends very nicely into the skin. The yellow tint allows the face to look healthy unlike some powders that leave a white cast on the face.
    • I have some oily spots on my face and this powder sets those oily spots so well that it can keep my face from being oily for more than 8 hours.
    • The powder itself is so finely milled. It feels like a luxury powder indeed.
    • I noticed that the luxury powders that are being sold online are so expensive! I was able to buy my bottle of the Banana Luxury Powder (1.5 oz.) at Pure Beauty (Serendra) for only php 500.
    • I’m quite satisfied with the amount of powder that I have for the price of php 500. My Laura Mercier Loose Translucent powder costs around PHP1800 and only has around 1 oz worth of product.
    What I don’t Like:
    • none!


    Extra Thoughts/Comments:
    • Initially, I was about to deliver bad reviews on this product because I didn’t feel like the powder highlighted my face at all. The photo of Kim K. above shows how superbly this powder highlights the face. I refused to be disappointed in this product and I finally thought of a logical explanation to make myself feel better. The powder was able to highlight Kim K’s face so nicely because she has darker skin than me. It didn’t do any highlighting for me because it blends in with my skin tone so well! My conclusion is that this powder can work for both fair skinned and colored women. It can be a setting powder for fair skinned women. It can be a highlighter AND setting powder for the morenas.
    • I can imagine that a lot of people complain about the packaging. I think that it’s packaged in that way because the manufacturer of the powder initially had make up artists in mind when they packaged the product. It can also explain why the packaging has a “no fuss and non non-sense” vibe. As an aspiring makeup artist, I appreciate the packaging because I can easily pour a bit of powder onto a tissue or a plate and apply. I like it for its hygienic purposes. :)
    Swatches
    Final Thoughts
    I really like this powder and would consider repurchasing. This is a good setting powder for both fair skinned women and morenas. This wouldn’t much highlighting for fair skinned women though. It best used as a highlighter on morenas. :) I like it because it an affordable luxury powder and it does it’s job impeccably. :)
    That’s it for now! I’d love to hear your thoughts on the comments below! <3

    xoxo,


    For more updates, like my page on facebook here

    Follow me on twitter! :)

    Follow me on instagram!


    Share:
    Beauty, Reviews

    Review: K-Palette 1-Day Tattoo Real Lasting Eye Pencil

    OLYMPUS DIGITAL CAMERA

    I know, I’m late. This new product I’m reviewing has been impressing one beauty blogger after the other. I bought this last April during my Hong Kong Trip but I only decided to open it last week. I have a tooon of unopened makeup items because I have too much makeup and I can’t finish them all. :( Anyway I finally decided to try out it out last week when I was looking for something new product to try. I find the greatest pleasure in trying out new cosmetics! :)


    I was really excited when I found out that K-Palette released a pencil version of their liquid liner because the K-palette liquid liner has always been a star in my makeup kit. The K-Palette 1-Day Tattoo Real Lasting Eye Pencil is a retractable eyeliner pencil that that comes in 2 shades: super black and deep brown. I’ve always been a fan of black eyeliners so I chose to purchase this in super black.

    What I love:

    I love that this eyeliner is retractable. I don’t have to deal with having to bring a sharpener in my kit to sharpen it or worrying that it will run out when I choose not to bring a sharpener in my kit. The bottom-line is that this pencil is super convenient to bring around. It’s very creamy and does not tug on my eyelids. The skin around our eyes is very delicate so it’s important to find products that apply easily and that doesn’t irritate our eyes. It’s so soft and creamy that it is highly recommended to only reveal 2mm worth of the pencil when applying it because it can break easily.  The shade is also very opaque. I can say that it IS a true black. One swipe on your lids does the job well. After a couple of uses, the tip of the pencil can be sharp enough to create flicks. I also observed that it didn’t budge when I tried to rub the swatch on my hand.


    the flicks i made with the pencil 

    after exposing it to running water.. I rubbed the swatches and they did not budge

    What I noticed:

    I don’t really have oily lids but I noticed that it started to smudge and transfer to my lids after a few hours of wearing it when I applied it on my bare lids. This has been a problem of mine with quite a number of eye pencils so I already know what to do in order to make eyeliner stay on my lids. I just apply a primer and make sure that it dries and then I apply powder on my lids to make sure the primer stay put. After doing this, I found that the K-Palette eye pencil stayed on my lids all throughout the day without budging. I think that the pigment transfers easily onto the lids because it’s sooo creamy.

    When Applied

    Final Thoughts

    The K-Palette 1-Day Tattoo Real Lasting Eye Pencil is a pencil that really performs well. It’s everything that a superb eyeliner pencil is supposed to be. However, If I had to choose only one between the K-Palette eye pencil and the K-Palette liquid eyeliner, I’d probably go for the liquid eyeliner. The liquid liner is much more precise, and stays on longer. I think the pencil is useful, still because it can be used for tight-lining which is something the liquid liner can’t do. It can also be applied on the water line (just make sure you set it with powder). It costs PHP705 in the Beauty Bar. It’s a bit more expensive than drugstore products and is almost half the price of high end pencils. Overall, this pencil is fabulous and does the job of lining the eyes, tight-lining, and lining the waterline.

    That’s it for now! What have you tried from K-Palette? I would love to hear about your experiences with K-Palette’s  products! :) Comment below and do share. <3

    xoxo,


    For more updates, like my page on facebook here

    Follow me on twitter! :)

    Follow me on instagram!


    Share:
    Beauty, Reviews

    Review: Etude House Color My Brows in 1 and 2

    OLYMPUS DIGITAL CAMERA

    I recently had a friend of mine who asked me for advice on what brow product she could use to match her light brown hair color. Her hair color is very similar to mine which is why it was kind of easy to answer her question. Her question got me to thinking that I never got to put up a review on my current go-to product for tinting my brows. I’ve been using this product for months now and I think it’s perfect for those who have lightly colored hair like me.

    forgive my Etude house Color My Brows shade in number 2. As I said, I’ve been using it almost every day for months now and the logo it initially had has already faded away.

    When I took my certificate course at MUD, I decided to purchase another shade so as to cater to the brown haired girl who will be on my makeup chair. :) So now I have the product in shades 1 and 2. 1 is the shade on the left and 2 is the shade on the right.

    Product

    From the name Color My Brows, the product is an eyebrow tint that has a gel to cream-like consistency. Shade number one is light chocolate brown shade while shade number two is a light brown shade with a touch of semi-orange hues. Both shades have really tiny flecks of shimmer in them. and  The product is quite small and is about the length of my palm. It has diamond shaped applicator made of natural bristles.

    What I Love:

    • Since it is common for women to have brown or dark hair, I use the shade 1 as an eyebrow gel to keep eyebrows in place.
    • Shade number 2 is perfect for my hair color because it matches my light hair color superbly.
    • The small size of the brush is perfect for those who have thin and barely there eyebrows like me. i think it’s better to have small brushes then big ones because girls with fuller brows can benefit small brushes as well. Girl with thin brows however may have a hard time using big brush applicators.
    • I like that they packaged the brow tints in a way that it is easy for people to identify the color of the brow tint. The shades of the brow tints match their packaging.
    • I’ve been using this almost everyday for roughly six months now and I still haven’t run out of the product.
    • It’s quite affordable at around PHP360.
    What I don’t like:
    • It’s sole purpose for me is to tint my brows. It doesn’t really fill in brows which is why I use my Face Shop retractable pencil to fill in my brows.
    • It doesn’t last all day on me. When I apply it in the morning, I find that it fades after around 11 hours of wearing time. I don;
    • I don’t mind reapplying though! :)

    When Worn:

    me wearing the shade 2

     Final Thoughts

    I think this is a cheap alternative to the high-end brow tints. It’s cheap AND effective. I recommend this to those who need brow tints to match their hair color to their eyebrows because hair and eyebrows that don’t match are a no-no! :) Just kidding. Well I just personally find it more pleasing to the eyes when a person’s hair and brow color match.

    What other tints do you recommend? :) Let me know!! :)

    xoxo,


    For more updates, like my page on facebook here

    Follow me on twitter! :)

    Follow me on instagram!

    Share:
    Beauty, Reviews

    Review: Maybelline Color Tattoo 24 Hours Eyeshadow

    OLYMPUS DIGITAL CAMERA

    Hi everyone!

    It’s the rainy season again here in the Philippines and I thought of reviewing some items that are quite perfect for the rainy season: Maybelline Color Tattoo 24 Hours Eyeshadow. Well, they are actually more suitable for summer since they’re cream shadows and they have such vibrant colors. However, I think that they are perfect for the rainy season as well because these lovelies can withstand the constant battle between the sun and rain. I purchased these Maybelline cream shadow gems US last year. I saw them in one of the many drug store there and I grabbed four shades: Tenacious Teal, Pomegranate Pink, Painted Purple, and Too Cool.

    Product

    These are cream  eyeshadows that have intense color payoff and are supposed to last 24 hours. Each eyeshadow is housed in a sturdy glass jar with a black screw on lid. The packaging is really nice and does not feel cheap at all. They remind me of MAC paint pots, actually.

    What I Love:

    • The formulation is excellent. They are super creamy and easy to spread out. They dry quickly though. Make sure to apply on one eye at a time.
    • The shades I purchased had wonderful color payoff. I picked out two loud shades and two more wearable shades.
    • They can be used as an eyeshadow base, eyeshadow alone, and eyeliner. I love that cream eyeshadows have so many functions. <3
    • I tried these on one at a time and did not experience any creasing or fading for around 15 hours. I don’t like wearing makeup overnight so I wasn’t able to test it out for the full 24 hours.

    What I dont like:

    • Since the packaging is really nice, these eyeshadows may not be travel friendly because they pack on a LOT of weight to  your travel make-up kit. (It’s not really a bad thing for me though. Just pointing it out. ;)

    Tips and Final Thoughts

    • When you’re in a hurry, you can use your fingers to apply this on your lids.
    • Use the bright colors as eyeliners for a pop of color on your peepers.
    • Use the white shade to make your eyeshadow appear more vibrant.
    • Use the pomegranate pink (which actually looks like a bronzey shade to me) as an eyeshadow base to your neutral eye makeup look.
    I really like these Maybelline cream eyeshadows because they are a cheap yet high quality alternatives to the very famous MAC paint pots. I recommend you guys to grab a shade or two if you can! :)

    Shades and Swatches

    Tenacious Teal

    Tenacious Teal

     Tenacious Teal

    Pomegranate Pink

    Pomegranate Pink

    Pomegranate Pink

    Painted Purple

    Painted Purple

    Painted Purple

    Too Cool

    Too Cool

    Too Cool

     What do you guys think?? :)

    xoxo,


    For more updates, like my page on facebook here

    Follow me on twitter! :)

    Follow me on instagram!

    Share:
    Beauty, Reviews

    Review: Maybelline Lasting Drama Gel Liner

    OLYMPUS DIGITAL CAMERA

    I haven’t been using gel liners until recently because I remember them having a really short shelf life which is why I was discouraged from buying them for quite some time.

    The other day, I was shopping for some basic cosmetics on a rush at Watsons and came across the Maybelline Lasting Drama Gel Liner and I decided to give it a try in black 01. They claim for it to have a “new improved formula, more intense, upto 36 hours lasting, smudgeproof and waterproof“.

    I had the first Maybelline LAsting Drama Gel Liner but I already tossed it out because it dried up already.

    What I love about the product:

    • The formulation is wonderful! The gel liner is so smooth, creamy and easy to apply.
    • Pigmentation is excellent. It comes out as a true black. It didn’t have a gloss of any sort.
    • It comes with a small flat dome-shaped brush. The brush is small enough to line on small asian eye like mine but I feel like it could appreciate the brush more if it was an angled brush just because it would be easier to wing out my eyeliner with one. The brush is also stiff enough to create lines.
    • Nonetheless, the brush is useful because it is long enough to fit my hand and allows me to comfortably line my eyes.
    • The packaging is so much better in my opinion! The old one had screw type lid as well but the lid itself is so much different from the old one. The new and improved lid suits my taste a lot more.
    • It’s very affordable! It’s about 500 pesos give or take.

    What I don’t like:

    • As much as I wanted this to last, it started to smudge throughout the middle of the day. I has semi raccoon like eyes by the end of the day. (You can still make this work by patting on some black eyeshadow on your eyeliner to make sure it stays in place though! :) )

    Swatches
    Final thoughts
    This product had three claims: new improved formula, more intense, upto 36 hours lasting, smudgeproof and waterproof.  Although this product started bleeding out after a couple of hours after use and in effect, did not last me 36 hours, this product was still a hit for me. Its formula was indeed better, it had excellent pigmentation, and it was such a dream to apply. The bleeding, which was my only problem about this eyeliner could be easily solved by setting it with a black eyeshadow or applying an eyeshadow primer beforehand. This is a drugstore gem and I’m so glad that I found it. <3<3
    what’s your drug store gem? :)

    xoxo,


    For more updates, like my page on facebook here

    Follow me on twitter! :)

    Follow me on instagram!


    Share:
    Beauty, Reviews

    Review: Bahama Mama by the Balm

    OLYMPUS DIGITAL CAMERA

    Hi guys!

    I’m back with another review on a bronzer called Bahama Mama by the Balm. My favorite bronzer, NARS Laguna broke when I dropped it during one of my makeup gig. <////3 So I brought out a new bronzer from my stash of unused makeup! It was a gift from my uncle and his wife on my 18th birthday (thanks auntie Javi and uncle sean! :) ).

    Product

    The product is a magnetic compact made out of cardboard and is encased in another cardboard with the same print and design of the actual product. You simply slide out the compact out of the thin cardboard case. The design is so lovely! The Balm always comes out with products with the prettiest designs! :)

    What I Love

    The bronzer is matte bronzer which I LOOOVE. It has an ever so subtle sheen to it but has no chunky shimmer whatsoever which is something I look for in my bronzers. Shimmery bronzers tend to not be able to do the job of contouring. This is because the shimmer further enhances the part that you want to hide via contouring.  It doesn’t look orangey when applied as well. It suits my skin tone nicely. :) The product is very finely milled and you can see that it really has excellent quality and is really easy to blend. I was very loyal to my Nars Laguna bronzer but this Bahama Mama bronzer by The Balm is soo good that I don’t feel so bad about losing my Laguna bronzer. It’s everything I want in a bronzer. <3

    What I don’t like

    I have no complaints about this bronzer! :)


    Swatches

    the bronzer did not show up so much in the camaera but it really looks nice in person! <3

    Final Tips and Recommendations

    I likes using this with my flat top brush from Sonia Kashuk. I use the side to draw a line on my cheekbone then i use the flat top side of the brush to blend everything out.

    I really love this bronzer and I can totally see it becoming a regular product in my makeup kit. I highly recommend this to those who like using matte bronzers. For those who don’t, this is definitely worth a try!! :)

    whats’s your favorite bronzer? :)

    xoxo,


    For more updates, like my page on facebook here

    Follow me on twitter! :)

    Follow me on instagram!


    Share:
    Beauty, Reviews

    Pink Me Up Nail and Dry Bar

    OLYMPUS DIGITAL CAMERA

    I am ADDICTED to getting my nails done. I have them done at least twice a month. I normally go to my favorite nail spa in Greenhills but my mom recently bought two vouchers for nail pampering services at the Pink Me Up Nail and Dry Bar located at Shaw boulevard, Mandaluyong City.

    The Nail and Dry Bar is located in a building and I had to walk through a series of hallways to reach the nail spa. Good thing is there were signs at each corner that guided me to the nail spa. ;)

    I am VERY fond of the color pink and my eyes were delighted to see such a well designed place! The room had just the right amount of pink and gray to balance out each other. The beautiful couches made me feel like a princess! :)

    Procedure

    My voucher was inclusive of a foot spa, pedicure, hand spa and manicure. I had two people working on me simultaneously. My feet were soaked in water. Next, my nail technician gently scrubbed my feet then  a foot mask was lavishly applied from my ankles to my knees. It smelled sooo good! The smell reminded me of grapes. <3 My feet were wrapped in cling wrap for a good 10 minutes and then my legs and feet were rinsed. The nail technician then applied a “cleanser” and lastly used oil to massage my briefly. Simultaneously, my nails were cleaned by another technician. The same procedure for the foot spa was done for my hand spa. After this, my cuticles were cleaned and my nail technician applied my polish of choice. I wanted to try out their caviar nails (40 pesos/nail) so another technician had to work on applying nail polish + caviar beads on my fingers.

    This area is for the dry bar. :)

    What I Loved:

    • The overall ambience of the place was just lovely. I have to say that they have really excellent interiors.
    • I was most excited about the caviar nails! They had a huuge selection of beads (I forgot to take a photo. </3)
    • The couches were very comfortable.
    • The magazine selection is wide and updated. (HUGE FACTOR FOR ME. ;) )
    • The nail technician who worked on my foot spa, pedicure and hand spa was well skilled.
    • Their polish selection is decent. Plus points for them being high-end polishes. :)
    • The technicians looked sleek and professional in their uniforms.
    • I experienced some new thing that i normally don’t experience with their foot spa treatment which was interesting. The “cleansing” liquid that they used right after the mask was something new and I appreciate it. :)
    • My skin and nails felt refreshed and pampered after the treatments. :)

    Observations/suggestions:

    • This is merely a suggestion. The place is fully airconditioned and when various masks are applied to the body, it may get really cold. I was freezing cold and I had to ask for a towel. The towel wasn’t big enough but I can let it slide. It would just be better for the overall experience if they  can provide scarves for each customer to use when they visit. :)
    • contrary to the nail technician who worked on my feet, the nail technician who worked on my fingers wasn’t very skilled. She almost cut through my skin with the nail cutter when she was cutting my nails. She was in a hurry. It’s a good thing that I felt it when she was about to cut through my skin and I was able to stop her.
    • I was checking out write-ups about the salon just to see if their service is consistent. I found out that the nail technicians wear portable flashlights around their head for better lighting and noticed that my technicians weren’t wearing any.
    • I also found out that 2 steps were missing from my foot spa: foot mist and “blush”.
    • Lastly, the couches had really tough pillows and it was hard for my to find a comfortable spot. I told the technician about my minor complaint and she offered me a soft pillow which she got from one of the cabinets. I think it would be better if each couch had one soft pillow each. :)
    My Nails

    Final Thoughts

    I’m suuuper passionate about reviewing nail salons because I am a nail spa addict and this is why I took the time to write out my observations. I see that the nail salon is a relatively new salon which is why it’s understandable for it to have some areas for improvement.Overall, I still enjoyed my experience at the salon. My voucher is worth 400 pesos and I think the actual price of the treatments is at least 800 pesos. I think that it was a really good deal and I will definitely return to the nail bar. :)


    Where is your go-to nail spa? :)


    xoxo,


    For more updates, like my page on facebook here

    Follow me on twitter! :)

    Follow me on instagram!


    Pink Me Up Nail and Dry Bar

    Unit 2D Lee Gardens Condominium

    (above Security Bank and Starbucks Coffee)

    along Shaw Boulevard cor Lee St. (near Petron Gas Station)

    Mandaluyong, Philippines

    Like them on Facebook!
    Share:
    Beauty, Reviews

    Review: Ddung Lipstick

    OLYMPUS DIGITAL CAMERA

    Hi there!

    I’m back with another lipstick review! I have this insane addiction for lipsticks so please bear with me. ha ha. I’ve never actually heard of the brand Ddung  until I met my friend Mitch, my classmate at MUD. She brought some samples and I thought that it wouldn’t hurt to try one out.

    Product

    I chose a Ddung lipstick in the shade DL03. It comes in an adorable plastic packaging. Comapared to my Karadium Lipstick, the packaging of this lipstick feels lighter and a bit more prone to breakage. The shade I chose is a really light pink and it reminds me of the lipstick that was released by MAC feat. Nicki Minaj.

    What I Love

    I’m a pink lippie kind of girl and I have a wide variety of pink lipstick shades. I don’t think I have a shade similar to this yet which is why this is the lipstick that I wanted to get. I really like how unique the color is! It is very pigmented and is easy to apply. It lasted around 4 hours on me. :)

    What I don’t like

    It feels likes a matte shade which is why it is a bit drying on me. I have dry lips so the lines on my lips were slightly emphasized when I applied the lipstick. It’s not something I hate. It’s just something that I observed. I also am not very fond of the packaging. It’s not much of an issue with me though.

    Swatches


    Final Thoughts and Recommendations

    I’m so happy to be able to add another lipstick that I like to my growing arsenal of lipsticks! I like this lipstick overall and I think it’s very affordable as well! I’d probably purchase some more colors in other shades. ;) To grab your own Ddun or Karadium lipstick, go here!

    That’s it for now! what do you guys think?

    xoxo,


    For more updates, like my page on facebook here

    Follow me on twitter! :)

    Follo me on instagram!

    Share: